Monday, December 26, 2022

New DNA sequencing results in new Latin names for Wood Ear, Ringless Honey and Velvet Shank,Enoki mushrooms

As some of you may already know, the fungi kingdom has been the target of an historic effort by the scientific community to analyze DNA and properly categorize fungi. Before DNA analysis, identification was based solely on appearance, behaviors and microscopic features. 

Things are changing dramatically as we learn more and more about fungus. Many mushrooms that look and act very similar -- which we had previously assumed meant they were related -- are actually not closely related at all. And may, in fact, be related to other fungus that look nothing like each other. 

As a result, I have updated my blog posts to reflect the current proper Latin/scientific names for the mushrooms I have featured on my site. 

NOTHING about identification or toxicity has changed. ONLY Latin NAMES. 

Sunday, May 29, 2022

Chanterelle no kneed, dutch oven bread, made with dried foraged wild mushrooms

Making bread never really interested me much. It seemed like it tied you at home in the kitchen, waiting for yeast to fart just so you could periodically punch it back down. My weekends are very precious and loosing hours that could better be spent outside in the woods, swimming, hanging out or even doing chores has never appealed to me, even though homemade bread is crazy delicious. 

So needless to say, I was intrigued when I started hearing about dutch oven breads, which had as little as 15 minutes of prep time, can rise in the refrigerator for hours or days, so you can get to them when you get to them, and who only need about 40 mins in the oven. 

Mushrooms infuse the bread 3 ways:
powdered mushrooms in the flour,  mushroom
reconstitution liquid and mushrooms baked on top

This manner of bread-making produces a small, dense, oval loaf with a crispy crust that becomes more like a sourdough if you leave it for a longer period in the fridge. 

These loaves are often baked simply, perhaps with some poppy seeds, or olive oil and fresh herbs, but I speculated there was no reason not to infuse the bread with other ingredients and flavors, and so I did. Having just come back from another foraging trip, our larder is rich with chanterelles, especially Cantharellus texensis. 

A pepper-tasting Texas red chanterelle

Unlike the fruity classic golden chanterelle, C. cibarius, the Texas chanterelle is mostly peppery in taste, with the fruitiness fading into the background, and I felt like that flavor would work well in a savory, crusty loaf. 


Plus, chanterelles and their closely related cousins, are often famously ground into powders and used as seasonings. Since they are very thin-fleshed, they dehydrate and grind easily, but their strong flavors mean even a small amount go a long way in terms of taste. So I decided to basically make an infused flour with ground cinnabar chanterelles. 

The darker color and speckled texture looks like whole wheat, 
but actually the color comes from specs of ground-up mushrooms 


The flavor of this bread is excellent, very, very umami and a bit peppery, with a hint of fruit-like sweetness on the very tail end of the palette. Traditional yellow chanterelles would probably make a sweeter loaf.

Beginner foraging: old man of the woods mushroom identification


Identification difficulty: Beginner

Meet the old MEN of the woods, "Strobilomyces strobilaceus" (though most books will use the term Strobilomyces floccopus) and Strobilomyces confusus. 

Old MEN, you ask? Yes, in the Americas the common name "old man of the woods" is often used interchangably for two different species of Strobilomyces that look rather similar. And there is still a different "old man of the woods" in Europe and Asia.

Confused yet? The naming gets worse.

The Latin name Strobilomyces strobilaceus applies only the European species. DNA studies have shown that the American mushrooms--previously believed to be identical--are genetically different, but a Latin name hasn't been chosen yet. 

From a foraging and edibility standpoint, none of this matters. All species share the same identification features, but if you're curious about species naming, check out the taxonomic confusion section at the end of this post. 

Old man of the woods identification

  • A cap and stalk mushroom 
  • Pores under the cap instead of gills.
  • Mushroom cap is light gray with dark gray to black textural elements. Textures can resemble large gray/black "flaps" that hang down (S. strobilaceus), or small gray/black pyramids that stick up (S. confusus). 
  • Pore surface is pale gray to charcoal gray to black. 
  • Pores aren't round, instead they are angular polygons, often elongated.
  • Stem is also dark gray or black and textural, with dark scales along most of the length.
  • Entire mushroom bruises pink or red when bruised or cut. This color slowly fades to gray or black. 
  • Found in the woods, growing terrestrially (on the ground) or on logs so well-decayed they are basically soil.

That's really all there is to know about identification, this really is an easy group of mushrooms to ID.

Saturday, May 7, 2022

Garlic lovers creamy wild garlic parmesan chicken. Foraging recipe.


I love garlic. Most people do, it's one of the most universally utilized spices in all global cuisines. Did you know that humanity is actually specially ADAPTED to love garlic? Most animals are repulsed by the smell and taste of Alliums (the genus that contains both garlic and onions); the pungency is actually a defense mechanism of the plant. And it's a good defense! Against anything except humans that is. Even in people, the smell illicits the same physical reaction as pain: it makes us cry. 

Garlic cultivation dates from at least 4,000 BC, coming out of Far East Asia, however it was almost certainly gathered/foraged much, much earlier, at least 2,000 and perhaps 4,000 years before that.

But why? Why would we eat a plant that illicits a pain response when we smell it?

Well, the entire plant is edible, relying on the smell/taste for defense, rather than poisons, thorns, etc. It's also one of the earliest spring greens to appear, and probably was initially sampled for this reason--little else was available. When our ancient ancestors found that the green part of the plants were non-poisonous, they probably would have sampled more, including the bulb. The bulbs of Alliums would have proven to be an essential resource for early hunter/gathers, as many are full of calories in the form of carbohydrates and sugars. 

Post-flowering garlic bulbils have all
the garlic flavor but don't
need to be peeled
Furthermore, after flowering, garlics and onions grow above-ground clusters of bulbils/bulbettes, which are also filled with essential carbs and sugars. Like nuts, berries and other fruit, these bubils are a source of calories and nutrients that are easy to harvest. In a hunter/gatherer society, calorie deficiencies are death. If you burn more calories to GATHER food than you gain, you will die. 

Which brings us to this recipe.

Right now wild garlic is producing the post-flower bulbils, which are perfect for the lazy garlic lover. 

Why dig when you can pick? Why chop when you can prepare whole? And, my favorite, why peel freaking garlic bulbs which I hate and takes so much time and frustration, when you can pick garlic bulbils. 

Garlic bulbils are the bomb because they have fantastic garlic flavor and don't have to be peeled! 


You're gonna need a lot more garlic


Lazy garlic-lovers creamy garlic parmesan chicken

Serves 4-8, total time about 40 minutes. 

2 lbs skinless, boneless chicken thighs (or breasts)

2 cups chicken stock

1 1/2 cups garlic bulbils, flowers and stalks, unpeeled, clusters broken up

1 cup heavy cream

1 cup shredded parmesan cheese

3 pats of butter

3 tbs. flour or almond flour

Salt & pepper

Olive oil

Parsley, optional

  1. Heat olive oil over medium-high heat in a large, flat-bottom pan. I used my favorite 5 quart sauté pan. 
  2. Lightly dredge the chicken in flour or almond flour, and add to the hot oil. Fry both sides until browned, about 5 min per side. I used the browning time to break up and lightly chop the garlic. Remove the chicken from the pan, and set aside on paper towels. 
  3. Add the garlic and 1 pat of butter to the pan, with more oil if needed. Sauté, stirring constantly, and scraping up the bits of chicken in the pan, until garlic is fragrant, translucent and browned. Because these garlic are inside their skins, you can let them get brown or even a little blackened and they will taste like garlic you roasted in the oven -- fantastic!
  4. Reduce heat to medium or medium-low. Pour in the chicken stock and heavy cream and stir completely. Add in the parmesan cheese and stir once more. 
  5. Return the chicken to the pan, and settle as far into the broth/cheese mix as you can. 
  6. Cover and cook over medium or medium-low heat for about 10 minutes, then flip the chicken and cook for another 8 minutes or so. Test for doneness. Stir in parsley, if using, and cook for one minute more. Remove and serve immediately. The sauce is also great on roasted veggies and potatoes.


Tuesday, May 3, 2022

Keto teriyaki steak rolls with curly "docksparagus" and garlic scapes


The long flower stalks of curly dock
can be cooked like asparagus
Curly dock, Rumex crispus, is one of the most versatile and abundant wild plants around. The broad, vitamin-rich leaves are the most-known part of the plant, and can be used like spinach or kale. 

As a biannual plant, curly dock produces only energy-gathering leaves over its first growing season. During the second season, the plant will shoot up a central stalk that will flower and eventually go to seed. 

These stalks are a very tasty and unique vegetable, similar in texture to asparagus, but with a sour/tart flavor, more pronounced than the leaves, but less than lemon or rhubarb. Due to the look and the texture, foragers sometimes call this part of the plant "docksparagus".


For dinner last weekend used  made teriyaki-marinated, steak-wrapped wild veggie bundles, topped with a teriyaki glaze, inspired by negimaki. I used docksparagus, wild garlic scapes, and some bell peppers for color and texture. The rolls were very easy and quick to put together, not counting marinade time, with a pretty early clean up as well. 

You can even do the bulk of the work (preparing the marinade) in advance, and store in the fridge.

They came out delicious, while still being healthy: low calorie, keto / low carb, full of nutrients, and dairy-free. 


Using the bulbils of wild garlic is super easy:
no peeling 
required!

I opted to use wild garlic bulbils (i've been calling them bulbettes al this time) heads instead of store-bought garlic here. I love using this garlic stage, it's so easy. The skins on the garlic bulbils are so incredibly thin you don't have to peel them for cooked applications, just mince everything -- bulbils, skins, flowers, stalks, flower stalks -- together and use in place of commercial garlic.  


Teriyaki steak rolls with wild plants 

Makes around 12 rolls 

2lbs sirloin, flank, top or bottom round, sliced to 1/8 thick

24 long, thin docksparagus stalks, remove tough or dried-out leaves

1 red, yellow or orange bell pepper, or 2 half peppers for variety 

Around 36 wild garlic scapes&

For the marinade / glaze

Beef stock 3/4 cup

Soy sauce 1/2 cup

Rice wine vinegar 1/2 cup

Garlic chili oil 1/4 cup, more or less for your spice level

Olive oil 1/4 cup

Sesame oil 2 tbs

Whole bulb garlic or equivalent wild garlic, minced 

2tbs fresh grated ginger

1 tsp white pepper 

1 tsp. corn starch or other thickener

  1. Mix all marinade ingredients together in a large bowl or 9x12 baking pan. 
  2. Add in the sliced beef and marinade at least one hour, or overnight. Marinade in the fridge if marinating longer than a couple of hours.
  3. If you've marinaded in the fridge, remove and allow the beef to come to room temperature before cooking
  4. Preheat the oven to 375.
  5. Cut the docksparagus and garlic scapes into spears around 4inches long. Slice the bell peppers into long strips. 
  6. Line a baking sheet with parchment paper. Remove the sliced beef from the marinade and lay out on the parchment. Do not discard the marinade
    Next time I would only use garlic scapes inside the rolls, 
    no garlic heads with bulbils

  7. Place a mix of veggies on each strip of beef. I used 2 bell pepper slices, 3-4 docksparagus spears and 3-4 garlic scape pieces.*
  8. Roll the beef around the veggies and fasten with a toothpick. Repeat for all beef slices. Drizzle with marinade. 

  9. Roast in the oven for 15 minutes, then flip each roll and roast for another 10 minutes. 
  10. While the rolls are roasting, bring remaining marinade to a rolling boil over high heat. Boil for at least 2 minutes. 
    For real though, remove the toothpicks before serving. 
    Don't make the same mistakes I did

  11. Mix 1 tsp. Corn starch in a small amount of water. Add to the boiling marinade and reduce heat to medium. Allow to thicken, stirring, and remove from heat. 
  12. Remove the rolls from the oven, plate, REMOVE THE TOOTHPICKS and cover with the teriyaki glaze. Serve hot.

*Special note about the wild garlic. Right now north Texas wild garlic is in a variety of stages: garlic scape (one enclosed bulb at the top of the stalk), flowering and bulbils, the post-flowering mini-bulbettes at the top of the stalk. The bulbils are excellent in the marinade or in any other minced application, however, they are too thick to cook all the way through if you use them (as I did) inside the rolls. Next time I will definitely keep to the scapes inside the rolls and the bulbils only in the marinade, as they were just a bit undercooked inside the rolls.

Obligatory note on curly dock. Rumex crispus contains substantial amounts of oxalic acid. While there are many commercially grown plants that contain oxalic acid, curly dock may have a larger content. Oxalic acid should be only eaten by healthy people in moderation. (If I do a meal prep with curly dock, I will generally only eat the meals every other day, rather than every day.) People with kidney or liver issues -- especially a tendency for kidney stones -- should avoid oxalic acid, as should breast-feeding women, it can have a laxative effect that can be passed to the baby through the milk. 


Sunday, April 24, 2022

Foraging: Identification of edible, young spring pokeweed / poke sallet


Identification difficulty: Novice

This post is a long time coming, I really should have made this post a long time ago. You see, it's bothered me for a while that pokeweed, Phytolacca americana, is such a popular edible wild plant, such a well-known plant, such a historically significant plant, and yet there is so very little info out there helping identify it when it's young and harvestable. 

There is a ton of info to help identify the mature plant, which is very easy to ID. But as I wrote once before, you can't EAT pokeweed when it's mature -- it becomes fatally poisonous. 

But in the early spring, they young shoots and leaves can be harvested, and, if properly prepared, are safe to eat -- even delicious. Like the best baby spinach you've ever imagined. 

It's such a popular food of the American South that it's been a part of our nation's cultural heritage, even becoming the theme of a hit song, Poke Salet Annie, in the late 1960s. 

If you've been curious about how to safely identify pokeweed when it's young, you've come to the right post!


Common places to look for pokeweed

Pokeweed is a transitional understory plant. Transitional meaning it thrives in the transitional period where as field and meadow become forest. It gets crowded out fairly easily by trees, so you will rarely find it in deep forest, instead look for small forest clearings (usually where a massive old tree has fallen, leaving an open space), on the edges of meadows or farmland and along man-made or animal trails. In nature, "washes" -- places where spring rainwater frequently comes down the sides of hills, clearing out small trees, frequently grow pokeweed.

This pokeweed is too mature to eat.
But it is growing in a classic spot: on
the edge between a field and woodlands
Pokeweed seed reproduction is very complicated. The seeds can't germinate UNLESS they've been swallowed and digested by a bird--exposed to that specific mix of chemicals inside an avian GI tract--and deposited in the highly acidic bird feces. 

However, if pokeweed roots get broken up, any piece of root about 2-3" long can grow a new plant. For this reason, human activity can spread pokeweed around like crazy. During excavation, construction and earth-moving, people may inadvertently break up a pokeweed plant, creating dozens more at the edges of construction, where the root-bearing dirt has been deposited. 

Consequently, look for pokeweed for along the edges of suburban developments built within the past 5 years, or along any area kept clear of trees by human activity: farms, parks/playgrounds, the edges sporting fields and along trails are all good places to look. 

The most pokeweed I personally ever saw was when my parents had their new Connecticut home build in 1990, when I was 10. The land had been farmland until the early 1900s, at which point it had been allowed to grow feral, reverting to forest, with tree ages not that much older than 50 years at most. There were also several clearings. In one of those clearings, where my parents build their house, there must have been at least one pokeweed plant, because when they dug the foundation, they disturbed those roots. For several years after, we had literally HUNDREDS of pokeweed plants surrounding the clearing of our home, until eventually small saplings started to grow into small trees, forcing the pokeweed out. 


Young spring pokeweed identification 

Many North Americans already know mature pokeweed by sight. It's hard to miss, as the plant can grow 6 feet tall and equally wide, in arching red boughs, bearing large, deep green leaves and 4-6 inch clusters of deep purple-black fruit on red stems.  

The problem is, by the time pokeweed is easy to spot and identify, it's well past the point where it can be safely eaten. This post will help you identify young pokeweed in the spring, when its safe to consume (after proper preparation): 

Super young pokeweed growth. Note the stalks of last year's plants in the background

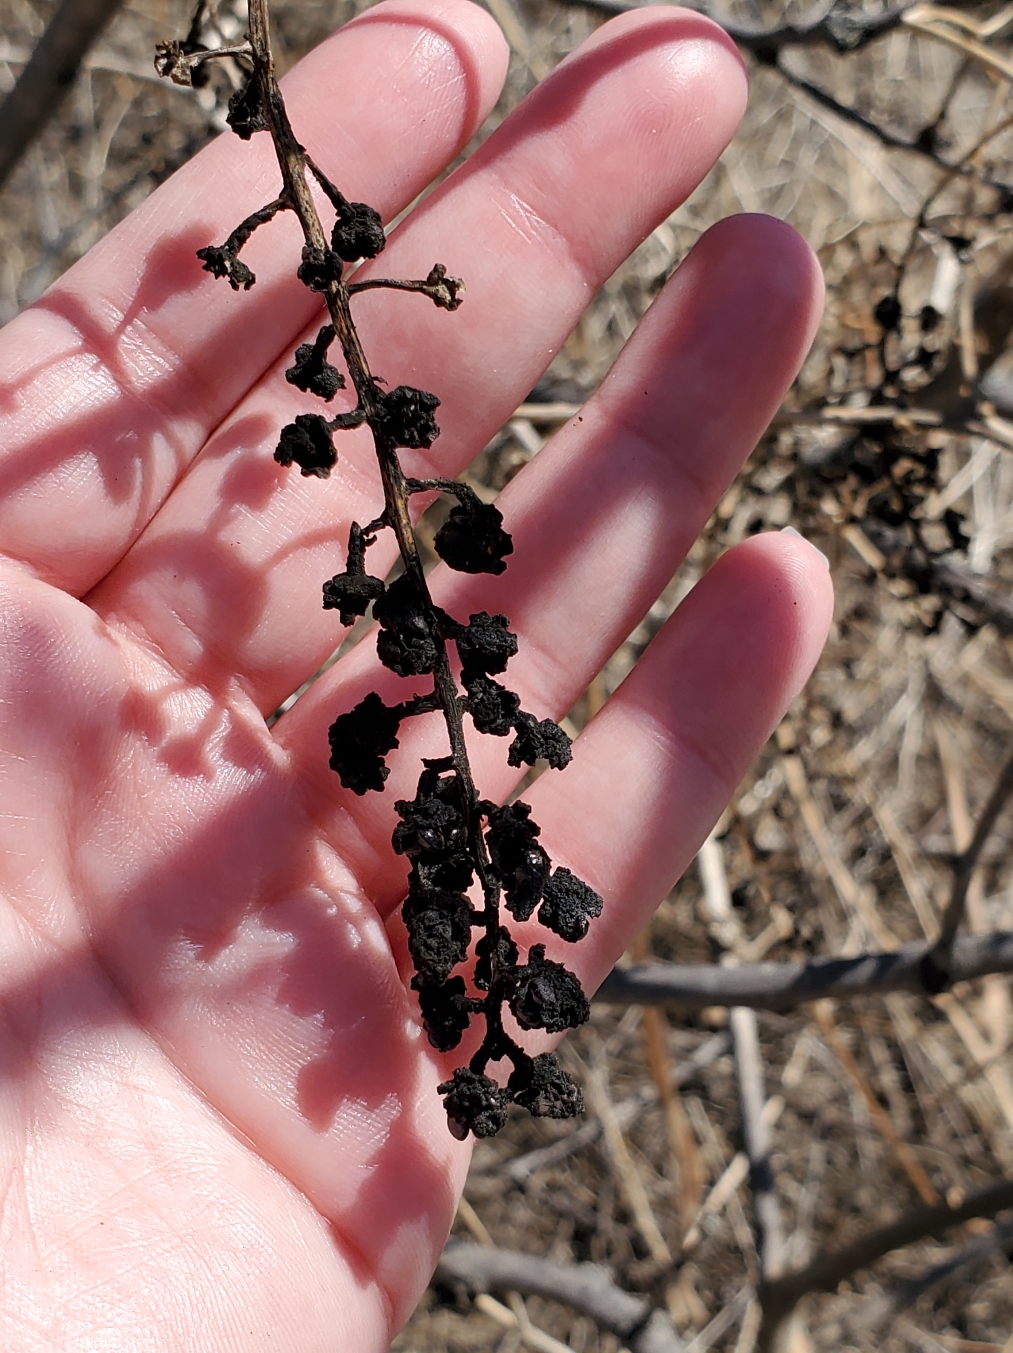
Dried up old fruit is the 
best way to pre-find pokeweed

Finding young pokeweed

When it first pokes out of the ground, pokeweed will mostly be visible by the leaves, which at this stage will be bright green, almost neon, wrinkled, ruffled at the edges, and with very prominent underside veins. 

Pokeweed is perennial: once established, it will regrow from the roots year after year. For that reason, you can find pokeweed before it grows by finding last year's plants. 

The stalks of pokeweed plants are long, hollow tubes that are beige in color, but often feature grey or black streaking and spotting. There will always be some dried up clusters of pokeweed fruit dangling from one branch or another. 

Side note: because old pokeweed stalks are hollow, breaking up the tubes makes an excellent tinder/fire starter, as long as they are very dry. 


The stalk is the most important way to identify pokeweed. 
Note in the slightly older plants on the right, the skin should be peeled away from the plant base
before preparing it for consumption


Stalk color and growth pattern
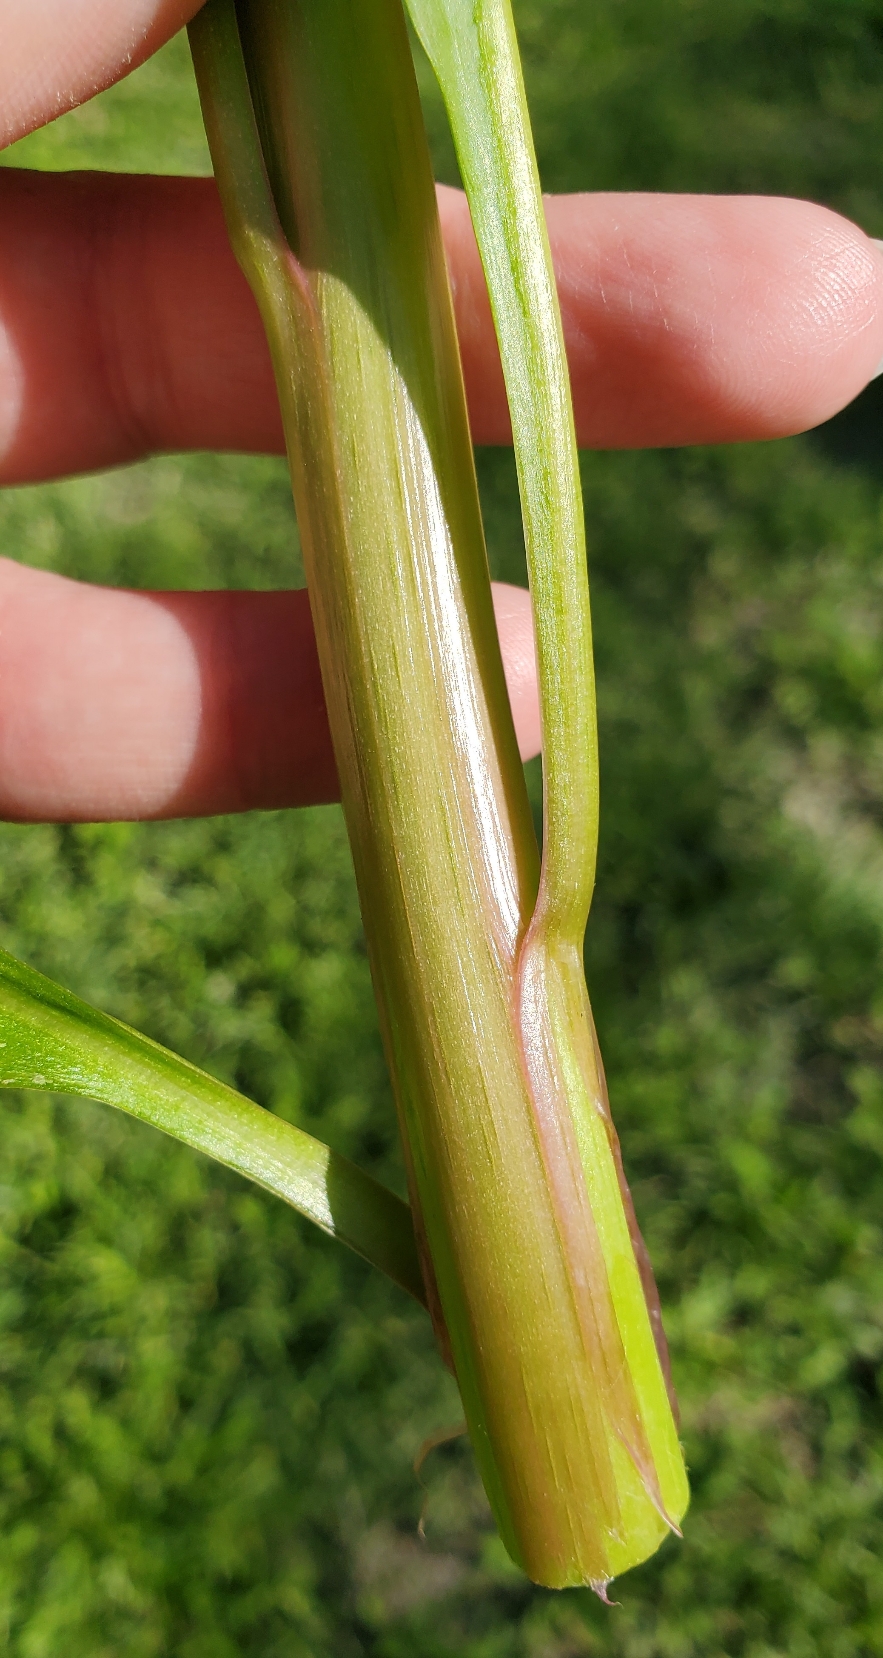
Pokeweed is safest
when the skin is
super thin, like this
The stalk is the most important identification feature for young pokeweed. The leaves and overall plant shape resemble many other wild plants (some poisonous) but the stalk is very unique -- once you know what to look for. 

The stalk of young pokeweed is translucent neon green tube around a white core, covered with a super thin, translucent skin that peels away pretty easily from breaks. 

The white core of the stalk is actually made up of parallel, horizontal chambers, which you can see easily by breaking into the stalk with a vertical cut. However, the younger the plant, the closer and tighter together the chambers will be, making them harder to see. 

The skin should be green, yellowish or faintly red. If the red coloring is more than just a hint, or faint streaks, then your pokeweed is too mature and should not be eaten. 

There is no hair on the stem, in fact if feels super smooth -- like plastic.

As the plant grows, the skin becomes thicker, and easier to peel away as a whole unit, without tearing. The group of pictures above shows two plants, the core on the left is at the perfect stage of size and growth. The middle and right are at just the last stages, and require a little extra prep work.  Notice on the left how the skin holds together and doesn't tear when pealed away from the central stalk. On plants of this age, I would peel the skin away from the base of the plant, and not cook it. The skin carries more of the dangerous chemicals than the green interior. 

Saturday, April 16, 2022

Scallion pancake with garlic scapes - Chinese restaurant style


If you're like me, sometimes you say to yourself, "Sure, everyone loves Chinese restaurant scallion pancakes, but how do I ward off vampire attacks?"

Well friends, today I have a recipe for you: make scallion pancakes, but substitute garlic scapes for the scallions. And wild garlic scapes are going crazy in north Texas right now. 

What are garlic scapes?


Garlic is a member of the Allium genus, along with onions, scallions, shallots, chives, and others. The garlic we buy in the store is a bulb, and, if planted, will grow a round-stalked green plant that eventually forms another bulb on top. This bulb is actually a cluster of "bulbettes" each of which will eventually form a flower. These bulbettes can break off the main cluster, fall to the ground, and grow a new garlic plant; it's the primary way garlic reproduces. 

In commercial garlic farming, farmers will pick the green plant before it can form this top bulb. You see, if the plant focuses energy on reproduction, it will drain the garlic bulb below the ground for energy. Garlic farmers don't want that, as they want to keep that bulb big and heavy to sell. Picking the green plant will force the bulb (the garlic) to retain it's energy and stay large. 

Recently, people have realized that the picked green plant, called a garlic scape, is a wonderful vegetable in it's own right: with a mild garlic flavor, a texture similar to leeks or scallions, and a zesty green freshness. Though only available in the early spring, you can find garlic scapes at farmers' markets and higher-end grocery stores, where they easily command prices of $10 a pound. Or you can also forage them on your own, for free. 


About the dish

Unlike many of my recipes, this dish requires a lot of time and effort, but it's well worth it. Just like in the best restaurants, these pancakes come out with an incredible balance of flavors and textures. They are crispy on the outside, flakey throughout, and super dense and a little chewy inside. The taste is predominantly garlic, as you would imagine, paired with warm spices and that delicious greasy flavor you can only get from fried foods. 

Though these take a lot of work, you can make extra and freeze them at about 3/4 of the way through the prep work, saving you a bunch of time in the long run. 


Garlic scape Chinese restaurant style pancakes

Makes 4 large (serves 6) or 6 medium (serves 4) appetizer-sized pancakes. Can be halved or quartered. Dish can be prepared up until frying and frozen for later. 

4 cups of all-purpose flour, plus 1 cup

2 large handfuls of garlic scapes

4 scallions, optional

Frying oil of your choice

2 tbs. sesame oil

1 tbs. salt

1 tsp. sugar

Chinese five spice powder

White pepper, optional but suggested if not included in your 5 spice mix 

Sichuan peppercorns, optional

Hot water, as hot as you can touch with your hands

For the dipping sauce

Dark soy sauce (or regular if you don't have dark)

Rice vinegar

Chili oil and/or chili garlic sauce or paste, optional

Sesame seeds, optional

Sesame oil

  1. Mix 4 cups of flour, the salt and the sugar in a large bowl with just enough hot water for the flour to come together into a sticky dough ball, about 1.5 - 2 cups. Mix it in a little at a time.
  2. Scrape the dough ball out onto a floured surface and to kneed until it comes together and firm up a bit. If you don't work with dough enough to get a feel for it, try 7 minutes of vigorous kneeding. Add more flour to your hands or the work surface, if needed, but try not to add too much or the dough won't be flakey. 
  3. Return the dough ball to the bowl and let rest for at least 30 minutes, while you prepare next steps. 
  4. Separate the heads of the garlic scapes from the stalks and leaves. Halve or quarter the heads, based on size, and mince the stalks and leaves.


  5. The garlic, while flavorful, tends to get a bit soft when cooked. I like to finely chop a few scallions in, for crispness. If you are using scallions slice them into thin coins and add to the chopped garlic.
  6. Add 3/4 of a cup of frying oil and a generous glug of sesame oil to a sauté pan and heat to medium high. Add in some of the garlic scape heads/bulbs, for extra flavor, and stir till fragrant.

  7. Whisk in about 1/3  a cup of flour and reduce heat. Continue to whisk until the flour is complete emulsified with the oil, and both are a warm tawny color. Remove from heat.
  8. Prepare the dipping sauce: mix equal parts dark soy sauce with rice vinegar. Mix in a drizzle of sesame oil and chili to your taste, if using. Optional: Sprinkle with sesame seeds and/or minced garlic and sliced scallions. 
  9. Once your dough ball has sat for 30 minutes, divide it into 4 or 6 pieces. If you divide into 4, each pancake will be about 9in in diameter; if you divide into 6, each pancake will be about 6in in diameter. 
  10. Roll out the portion of dough into a rounded rectangle about 1/8 in thick, is ok if it gets a little thin in the middle, it's even ok if it gets a small hole or two. 
  11. Using a pastery brush, thinly spread the dough sheet with the flour and oil mixture over the surface of the sheet. It should go close to the edge, but not drip off.
  12. Sprinkle with Chinese 5 spice powder, white pepper and ground Sichuan pepper, if using. 


  13. Generously cover the sheet of dough with the garlic and scallions.
  14. Working from the long side, start to roll up your sheet of dough into a tube. Don't worry if your roll isn't tight, or if some garlic pokes through, or if some air gets trapped inside. 


  15. Grab each end of the tube and raise in the air. GENTLY bounce up and down like a jump rope, pulling slightly on each edge, to stretch the tube.
  16. Lay the tube of dough to rest, and brush the top side with more oil/four mix. Roll the tube into a spiral, like a cinnamon bun, keeping the oil side inside the coil. Set your "bun" aside to rest. Repeat the process with each chunk of dough. 


  17. Sprinkle flour over your rolling surface and with your first spiral of dough and garlic. Use a rolling pin to roll out the spiral to about 1/4 inch thick. You don't really have to worry about runaway garlic, but if you want to, you can remove any that poke through. 
  18. Repeat for each spiral. At this point, if you don't plan on eating each pancake right away, you can separate them with freezer paper and freeze in a zip-lock bag.
  19.  Heat plain cooking oil a large sauté or cast-iron pan to medium high. Add the flattened spiral pancake to the oil and fry for about 2 minutes. Flip the pancake, and fry for another 2 minutes. Repeat the process for 1-2 minutes more per side, till golden brown and cooked thorough. Repeat for as many pancakes as you like, allow each to cool slightly on paper towels, cut and serve right away with or without the dipping sauce. 

Thanks to Inga Lam's video on scallion pancakes, which I borrowed heavily from when creating this dish. 


This one was my favorite because it came out looking like a certain famous spaceship we all know
but can't legally use the name of :D


Thursday, March 24, 2022

Garlicy bastard cabbage flower buds and stalks - Italian style


Ok spring in Texas has been quite delayed this year due to reoccurring cold spells throughout the mid-to-late winter. December was comfortably mild, but January and February saw short but deep chills every week or two. As a result, we are about three weeks behind where we usually are in the foraging season. And it's been quite frustrating for me. 

Usually at this time I would have an abundance of pokeweed, wild garlics, cleavers, chickweed, dock, thistles. mustards, and more. Henbit and deadnettle, often found in February, are just now starting to peak.

The perfect stage for harvesting flower stalks and buds,
Make sure to break the stalk at a natural snapping point.
But if there is one good thing about the delayed season, it's that its forcing me to look outside of my comfort zone to find plants to forage. Bastard cabbage, Rapistrum rugosum, is a highly invasive mustard species which is found in abundance in Texas, though often sprayed and therefor not safe for consumption. 

While generally not highly regarded as a food source, I've found it to be utterly delicious when properly prepared. The secret is in the hairs all over the plant, which can be unpleasant in texture, but are softened by blanching. Blanching also brings out a mellow sweetness, and overall R. rugosum is perhaps my favorite wild mustard, with a flavor combining brocollini, sweet corn and asparagus with a very mild mustard spiciness. It's truly delicious. 

Though I've cooked extensively with the mature leaves of the bastard cabbage plant, this week was my first stab at using the tender young flower stalks and flower buds. Foraging author Sam Thayer describes this as his favorite part of the garlic mustard plant (Alliaria petiolata), also in the mustard family. I've tried garlic mustard that way, and was not impressed. But bastard cabbage was another story. 

From my husband, "This is one of the best wild plants we've tried." And I have to agree with him. 

Right now R. rugosum looks pretty much like the picture above, leaves are smallish, and generally the plants aren't flowering, though they have formed buds. You are going for the central and side stalks, with the very smallest leaves attached and the flower buds at the ends. You want to feel down the stalks until you find the area where it breaks off easily. If it doesn't break easily, and only bends, then that stalk is too mature and will be woody. Generally speaking, once most of the buds are in flower, they will be too tough and woody. 

Once the buds have flowered, the stalks are generally
tough and woody


Once picked, the buds and stalks strongly resemble rapini/broccoli rabe or broccolini/baby broccoli. Broccoli rabe is a favorite in Mediterranean and Italian cuisine, and broccolini is most often eaten in Japan and other Eastern countries. Both are usually given simple seasoning and then sautéed or stir-fried briefly, over very high heat. 

I decided to try a classic Italian preparation here, modified with the addition of a quick blanch, and ended up with an excellent, 3-ingredient side dish that took only around 10 minutes to prepare. 


Italian-style garlicy bastard cabbage flower buds and stalks

Serves 2-3 as a side dish

2 cups of bastard cabbage buds and stalks

2 cloves of garlic, sliced

3 tablespoons high-heat olive or avocado oil

Sea salt to taste

  1. Bring enough water to cover the bastard cabbage buds to a rolling boil. Add in the bastard cabbage and blanch for around 2 minutes, or until the green color brightens. Drain and rinse with cold water. Shake the greens in the colander, leaving them a little damp.
  2. In a large sauté pan or wok (preferred) bring the oil to high heat. Add the bastard cabbage to the pan, and sauté on high, moving the greens and the pan constantly for about 2 minutes, until the color becomes a very vivid green. 
  3. Add the garlic to the pan and continue to sauté/stir-fry, moving constantly until the garlic is soft and very fragrant, about 3-4 more minutes. Remove from heat and serve immediately. 

This side dish is very diet restriction friendly. It's low in fat, carbohydrates and sugars, gluten-free, Keto diet-approved (mustard greens being very low in net carbs), vegetarian, vegan, and Paleo, depending on the oil you choose. 

For a very Texas meal, serve as a side to steak


Saturday, January 8, 2022

How to identify shaggy mane mushrooms, perfect for beginners


Identification difficulty: Beginner

Coprinus comatus, commonly known as the shaggy mane mushroom, shaggy ink cap, or the lawyer's wig, is generally considered to be a very easy mushroom to identify, but care must still be taken when identifying it. 

In fact, it's generally considered to be one of the "foolproof five" which includes chicken mushrooms, black trumpets, morels, and giant puffballs. 

I personally cannot emphasize enough, the "foolproof five" is a myth! 
Shaggy mane starting to deliquesce, 
at this stage easy to ID, but less
desirable as food
No mushroom is completly foolproof. Morels are commonly misidentified as potentially deadly Gyromitra species. I've seen chicken mushrooms confused with Flavolus (edible), orange mock-oysters (poisonous), berkleys polypore and other polypores. Even black trumpets, the mushroom I find most "foolproof" can be confused with devil's urn, though the mistake is harmless. 

Shaggy mane mushrooms can be, and frequently are mistaken for:  Coprinopsis atramentaria (potentially poisonous), Chlorophyllum molybdites (very poisonous--but not deadly), and Amanita thiersii (possibly poisonous).

If you aren't trying to eat shaggy manes and can afford to wait thier whole life cycle, they are really easy to identify. The problem is, by the stage of thier life when they become easy to identify, they are no longer suitable to eat, because of deliquescence.  As the mushroom ages, it deliquesces, eventually turning into a black goo.


The black goo is easy to identify, but not something you would want to eat. 

As a forager, the trick is to find and identify the mushrooms before they start to deliquesce, and at that stage its possible to confuse the mushroom with a couple of others. 

Sunday, January 2, 2022

Chickweed frittata with prosciutto, potatoes and shallots. High protein, gluten-free foraging recipe.


Happy New Year everyone!!

I hope you've had a fantastic holiday season: safe, healthy, fun and full of family and friends. 

For us, Texas has been magnificently warm, with temperatures in the 60s and even into the 70s throughout the month of December. 

As a result, the plants have been seriously confused as to season, with many spring plants sprouting and even flowering. The strangest I've yet seen are violets in flower!

Foraging has been superb, when I can get to it. A major project at work has kept me working late, and sometimes even weekend overtime. 

One of my favorite, generally spring-only ephemeral plants -- chickweed -- has been coming up in large patches or dense matts everywhere. 

Chickweed is delicious, one of the few wild greens that I will eat both fresh or cooked. It has a flavor like spring peas, with a hint of sweet corn and Boston lettuce. When you cook it it becomes slightly herbal, like spring onions. A very versatile plant, no one I know who has tried it has disliked it, making it great for new foragers. 

A quick recipe for today: a decedent frittata. This time I've made it properly, starting everything over the stove and only finishing in the oven. Previously, I've often made frittatas in the oven-only, which saves time and cleanup, but at the cost of flavor. 


This recipe is delicious, easy to do (though somewhat time-consuming), gluten-free, high in protein and great as a main course for breakfast, brunch, lunch or dinner. 

Chickweed frittata with prosciutto, potatoes and shallots. 

Prep time: 10 minutes, cook time: 45 minutes. Serves 4-8 as a main course. 

6 eggs

4 cups of roughly chopped fresh chickweed

3/4 lb of prosciutto, diced

1/2 lb fingerling potatoes, chopped bite size

3/4 cup of sliced shallots

4 cloves of garlic, minced

1/4 cup heavy cream

5 oz. grated hard cheese (asiago, parmesan, etc.)

1+ sticks of butter

Salt, pepper, ground celery seed

  1. Lightly salt 8 cups of water and bring to a boil. Once boiling, add your chopped potatoes and reduce heat to a slow boil. Continue until potatoes are soft, then drain.
  2. In a separate bowl, whisk together eggs and heavy cream. Set aside. 
  3. In an oven-safe 11" sauté or cast iron pan, melt 1-2 pats of butter over medium-high heat. Add in your sliced shallots. Sprinkle with salt and celery seed and cook, stirring often, until shallots are translucent and beginning to brown. 
  4. Add in your garlic, and more butter if needed. Continue to sauté until shallots are fully caramelized. 
  5. Add the prosciutto and sauté about 5-7 minutes until the meat has softened. Add in the cooked potatoes, season with ground black pepper and celery seed, and stir. 
  6. Working in batches, stir in chickweed. When each batch wilts you can add in more. 
  7. The chickweed will release a lot of liquid. Make sure you cook, stirring frequently, until all the liquid has dried. You can increase heat to do so. 
  8. Reduce heat to low. Stir for about 10 minutes to allow the temperature to reduce.
  9. Add in 4 oz. of your grated cheese, stir to mix until melted. 
  10. Slowly pour in your egg and cream mixture. Gently stir the pan, once or twice to allow the eggs to fill in around all the ingredients. 
  11. Continue to cook over medium-low heat, without stirring, until the eggs are fully cooked. You can occasionally turn or shimmy the pan over the heat. 
  12. Preheat the oven to 400 degrees. Top the cooked egg mixture with the remaining grated cheese. Bake in the oven for 5 minutes, until cheese melts. Remove from oven. 

  13. Raise oven temperature to a broil. Return frittata to the oven, and broil for 3-5 minutes until cheese is browned and bubbly. 


Enjoy! My pictures really don't do this dish justice!